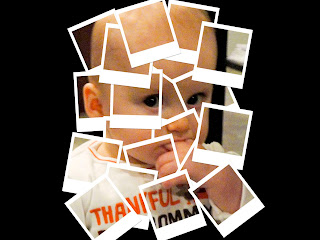
David Hockney is and artist and photographer who takes many polaroids of one subject, then adds them all together to create the picture again. We did the same thing, only digitally. We used a picture we had already taken, I used baby Elliot again, then copy and cut each picture, then rotated them. You end up with the same result!
Monday, December 6, 2010
Portrait Photography
These pictures are mostly of Elliot, the baby. I changed the top photo of Elliot and his mom into black and white, then increased the Contrast and decreased the Saturation. I cross-processed the second one, then the last two I added an ink-sketch look to them.
Downtown Mall
My class went on the Downtown Mall and took pictures. We then transformed them into objects in the game Where's Waldo. I changed 1-3 things in each photograph, like maybe a line in the brick is changed. Can you find the differences?
Photo Aging
For this picture, I used a picture I took of an old car. I added a Sepia filter, and increased the Grain, and increased the Noise. I used two brushes: the rip brush, and the coffee stains. I also tilted the actual picture to show that back in the old days, they weren't always straight.
Friday, November 19, 2010
Collage
This is my collage. I replicated Virginie Transon. Mine looks like hers because she uses a lot of bright colors, like I did here. Also, I put a domestic animal in the centre just like hers. Both collages have many random objects within them, with two central colours. Both also have a background made up of strips of different coloured backgrounds.
Glowing Lights
I used the pen tool to create two radial designs and a comet. I had to create rays for the comet, and had to use the pen tool to make the ovals to turn in the radial design.
Typography
Typography is when you use letters to create an image. Here, I used O's for the head, body, eyes, and bellybutton. I used D's for the feet. I used H's for the legs, an S for the hair, and a squiggle line for the arms. I created a robot.(:
Thursday, October 28, 2010
Spooky Pictures
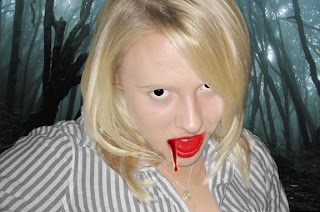
This is a spookified picture of my friend Leah. I put a Soft Light blending mode for the colour on her to make her skin and hair lighter. I then put an Overlay blending mode for the colour red to make her mouth red. I also made her eyes a black colour by using a Hard Light blending mode.Then I added the drip of blood from her mouth. Finally, I Quick Selected her out of her backround and put her in scary forest.
First I Quick Selected Jules, and made her black and white. Then, I Quick Selected her out of her backround and added her to this spooky backround. Then I Layer Masked the noose in.
Carter's Mountain Pictures
I color corrected this picture of a apple on the ground. I also put the Contrast up, and the Exposure down. I liked this picture because the sun is streaming in really nicely.
I color corrected this picture of grass and a fence.
I made the backround black and white, then Layer Masked in the apple's original colour.
I made the backround black and white, then Layer Masked the kids and the apples back in to their original colour. I then added an ad to the picture.
I put the Sepia filter on this image, then added a message at the bottom. I put a white Outer Glow effect on the message.
Visual Puns
This is a deviled egg. I Quick Selected the arms, mouth, horns,eyes, tail, and pitchfork from a picture of a devil.
This is a Lemonhead. I Quick Selected a man's body and put a lemon as the head.
Wednesday, October 27, 2010
Six Sharpened Macro Pictures
This is a wine bottle.
This is a Boston Red Sox hat.
This is the top of a shoe.
This is a pencil and paper.
This is a woven chair.
This is a Yoplait yogurt container.
Mid-Term
This originally was just a picture of a street with no signs or hydrants. I added the bald man with the green shirt up front and his shadow usign Quick Selection and Blur. I did the same with the man in the black T-shirt in the back. I then added a fire hydrant using Layer Mask. Finally, I added a "No Loitering" sign on the post.
Friday, October 22, 2010
Jumping Off the Page
This is an image of a shark "jumping off the page" off onto the blue backround. I used the Paint Bucket tool to change the backround, and the Quick Selection tool to select the shark out of it's original backround.
I also used the Effects tool to put a white out glow on the picture of the sea, and to put a shadow under the shark.
Camera Raw
This is a picture of the front of an abandoned car at Carter's Mountain. I adjusted it by putting the Saturation on zero, and adjusting the blacks to be more prominent. I used the plug-in Camera Raw.
This is a picture of the sky off of the top of Carter's Mountain. I also adjusted this one to be black and white in Camera Raw, and made the blacks darker.
This is a picture of my friend Sarah. The light was orginially too bright and over-exposed, so i used the Exposure tool in Camera Raw to make it a little bit darker. I also used the Clarity tool to make the outline of the leaves clearer and more distinct.
Friday, October 8, 2010
Thursday, September 30, 2010
Rule of Thirds Pictures
I got this image at wordpress.com
I got this picture at best-camera-or-best-pictures.com
I got this image at nubloo.com
Rule of thirds is 5 imaginary lines on a picture that show you where the natural line of sight is. There are two vertical lines, and three horizontal.
Rule of thirds is 5 imaginary lines on a picture that show you where the natural line of sight is. There are two vertical lines, and three horizontal.
Subscribe to:
Posts (Atom)


.jpg)


