Thursday, October 28, 2010

Spooky Pictures

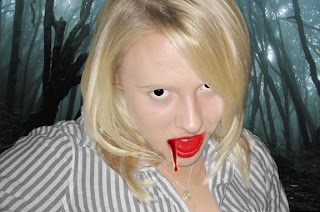
This is a spookified picture of my friend Leah. I put a Soft Light blending mode for the colour on her to make her skin and hair lighter. I then put an Overlay blending mode for the colour red to make her mouth red. I also made her eyes a black colour by using a Hard Light blending mode.Then I added the drip of blood from her mouth. Finally, I Quick Selected her out of her backround and put her in scary forest.

First I Quick Selected Jules, and made her black and white. Then, I Quick Selected her out of her backround and added her to this spooky backround. Then I Layer Masked the noose in.
Carter's Mountain Pictures

I color corrected this picture of a apple on the ground. I also put the Contrast up, and the Exposure down. I liked this picture because the sun is streaming in really nicely.

I color corrected this picture of grass and a fence.

I made the backround black and white, then Layer Masked in the apple's original colour.

I made the backround black and white, then Layer Masked the kids and the apples back in to their original colour. I then added an ad to the picture.

I put the Sepia filter on this image, then added a message at the bottom. I put a white Outer Glow effect on the message.

Visual Puns

This is a deviled egg. I Quick Selected the arms, mouth, horns,eyes, tail, and pitchfork from a picture of a devil.

This is a Lemonhead. I Quick Selected a man's body and put a lemon as the head.

Wednesday, October 27, 2010

Six Sharpened Macro Pictures

This is a wine bottle.

This is a Boston Red Sox hat.

This is the top of a shoe.

This is a pencil and paper.

This is a woven chair.

This is a Yoplait yogurt container.

Mid-Term


This originally was just a picture of a street with no signs or hydrants. I added the bald man with the green shirt up front and his shadow usign Quick Selection and Blur. I did the same with the man in the black T-shirt in the back. I then added a fire hydrant using Layer Mask. Finally, I added a "No Loitering" sign on the post.

Friday, October 22, 2010

Macro Examples


Jumping Off the Page

This is an image of a shark "jumping off the page" off onto the blue backround. I used the Paint Bucket tool to change the backround, and the Quick Selection tool to select the shark out of it's original backround.
 I also used the Effects tool to put a white out glow on the picture of the sea, and to put a shadow under the shark.

Camera Raw

This is a picture of the front of an abandoned car at Carter's Mountain. I adjusted it by putting the Saturation on zero, and adjusting the blacks to be more prominent. I used the plug-in Camera Raw.

This is a picture of the sky off of the top of Carter's Mountain. I also adjusted this one to be black and white in Camera Raw, and made the blacks darker.

This is a picture of my friend Sarah. The light was orginially too bright and over-exposed, so i used the Exposure tool in Camera Raw to make it a little bit darker. I also used the Clarity tool to make the outline of the leaves clearer and more distinct.